Think adding a door to the curtain wall is similar to adding a door to a wall? Absolutely not~~! This is definitely a “You can’t do it if you don’t know the trick” topic. I am going to walk you through the “trick” to add a door to the curtain wall. It doesn’t matter if it is an exterior or interior door, the concept is the same.
A curtain wall door is actually a curtain wall panel. Instead of “adding” a door to the curtain wall with the Door tool, we are “swapping out” the glass with a curtain wall door. Yes! It is a totally different concept, who would have thought of replacing a pane of glass for a door!? But the interesting part is once the curtain wall door is placed in the model, Revit reads the curtain wall door as a door in the Door Schedule and in Visibility Graphics (VG). However, a curtain wall door can never be replaced by a regular door and vice versa. To summarize the concept, the curtain wall door is a curtain wall panel that pretends to be a door.
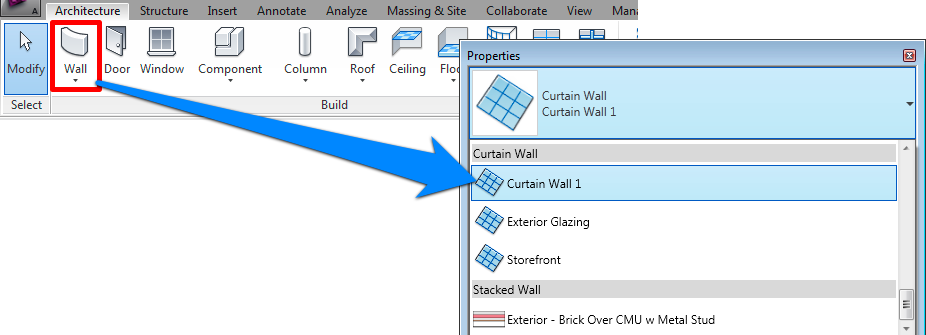
Create a curtain wall | For the purpose of this exercise, I am going to build a simple curtain wall. With a Plan View open, go to Architecture tab > Wall (under Build panel). Go to Properties, from the Type Selector menu, scroll down to the Curtain Wall category and select Curtain Wall 1. Draw your curtain wall.
Definite the door size and location | At this point, your curtain wall is just a plain piece of glass. In the plan view, add an Elevation Tag to create an Elevation View of the curtain wall. We are going to define the the door size and door location in the Elevation View. With the Elevation View opened, go to Architecture tab > Curtain Grid (under Build panel). Use this tool to add horizontal and vertical grids** to divide the glass into segments. This will also define the outline of the door.
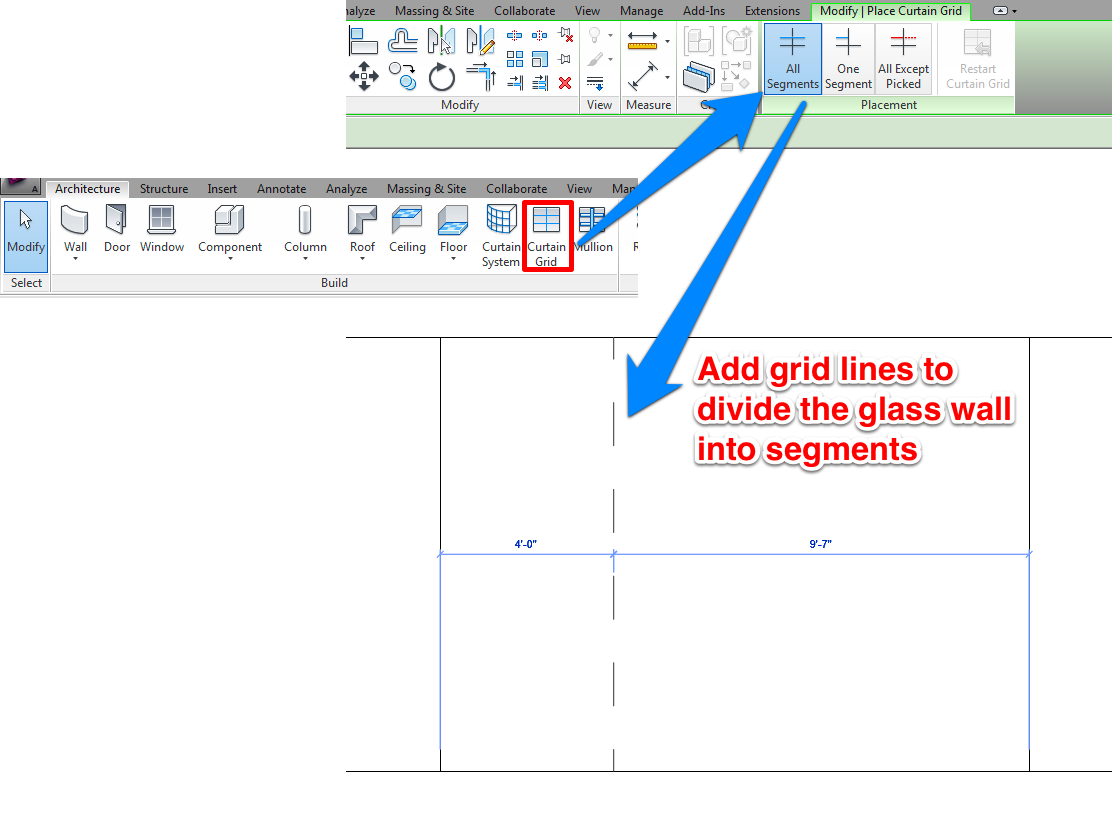
** The grid does not necessary be extended full height or full length. For example, you can delete segments of unwanted grid line by selecting them using the “TAB” key from the keyboard. In the image below, I have removed the vertical grid line above the door.
Add the door | Hover your mouse pointer over the panel of glass where the door will be. Hit the “TAB” key on your keyboard until the panel of glass is selected. Go to Properties, from the Type Selector menu, scroll down until you see the curtain wall door, select the door to swap out the glass panel.
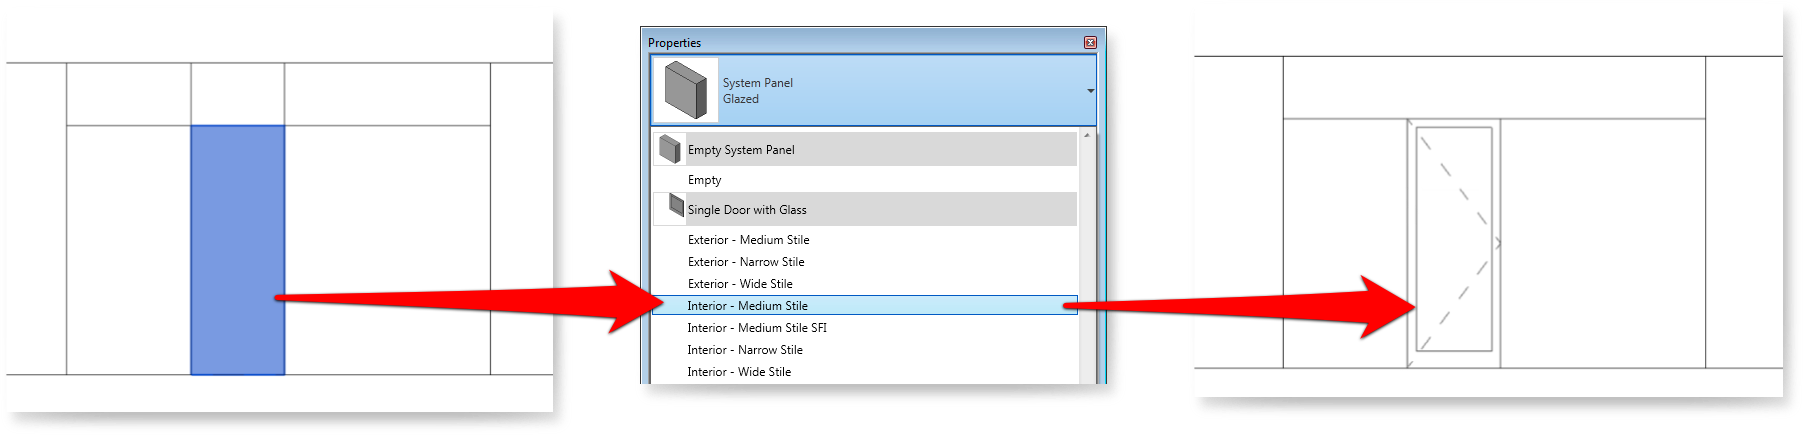
Don’t see any door from the Type Selector menu? Open up the “Door” family folder in the Content Library and load it into your project. The curtain wall door family should name something like Curtain Wall Dbl Glass.rfa, Curtain Wall Sgl Glass.rfa. You can also build your own curtain wall door using the “Door-Curtain Wall.rft” family file or load your firm’s custom made curtain wall door family.
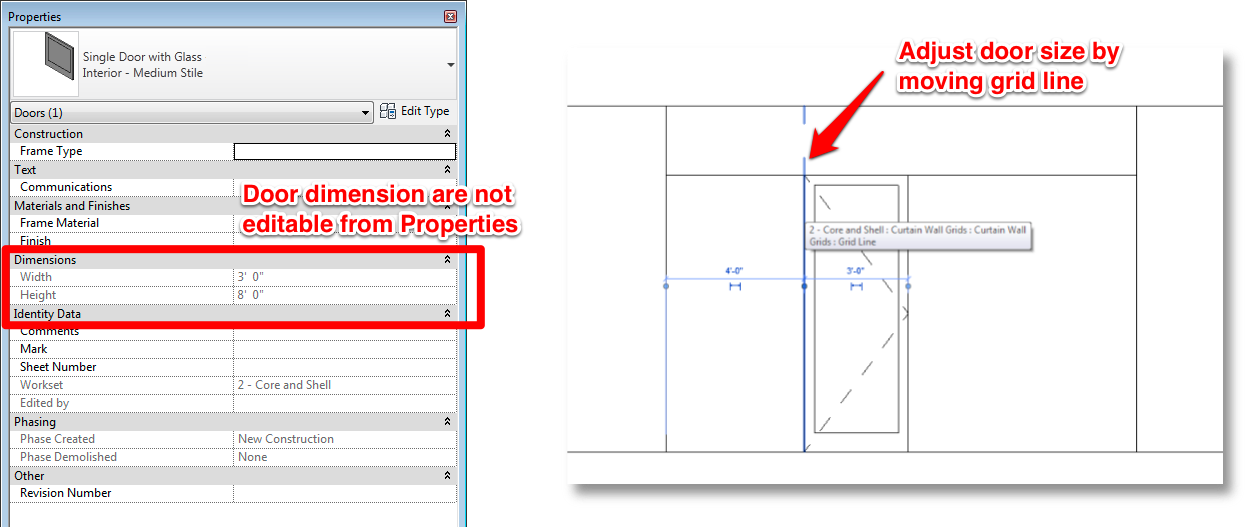
Resize the door | If you select the door, you will see the door size is grey out in the Properties menu. Door size can only be adjusted by moving the curtain wall grid. To change the door size, hover the mouse pointer over the Curtain Grid line. Drag the grid to resize the door.
Remove the door | To remove the door, select the curtain wall door. Go to Properties, from the Type Selector menu, select back the Curtain Wall Panel to swap out the door.
Hope this post clears up some of your frustration with curtain wall door. Enjoy!
Interested in this topic? Here is another post you might be interested in:
How to show Demolition Door in an Existing Curtain Wall? – Method 1
How to show Demolition Door in an Existing Curtain Wall? – Method 2
Awesome post.
Thank you so much, I looked all over Revit City, the official Autodesk Forums, and youtube to find this info and no one had an answer. Thank you.
Perfect solution to the problem of creating door in curtain wall. Thanks a lot.
I appreciate your enthusiastic articles.
Here I inserted translated version of the article:
http://www.irancad.com/newsdetail-382-fa.html
Many thanks, Veng Leong.
Pretty! This was an extremely wonderful post. Thank you for providing these details.
Followed you to the point where you said “Add the door”.
I cannot select an individual panel in my curtain wall to change it.
I think it may have been the way I made my curtain wall.
Anyway, something to keep in mind. I will keep trying.
in the “Add the door” section, you should also state that you need to ‘unpin’ the panel of glass.
Thank you
This was very helpful.
When I’m pressing the TAB, it gives sound, no panel is selected. please help me…
Fantastic !
I found a YouTube Video on this Topic: https://www.youtube.com/watch?v=0eKoB7ca4T4
Very, very helpful…thank you for the post
This was so helpful!!!!
thanks for this post. it was easy to follow. no jargon words. keep up posting valued post.
Thanks Poch.
TQ SO MUCH FOR YOUR INFORMATION
DON’T FORGET TO UN-PIN THE PANEL. If you don’t un-pin the panel, the option to change to a door will be grayed out, and you will not be able to change it. This is a small step, but a very important one, and if you are not aware of Revit’s “pinning” habits, it will be difficult and frustrating to figure out.