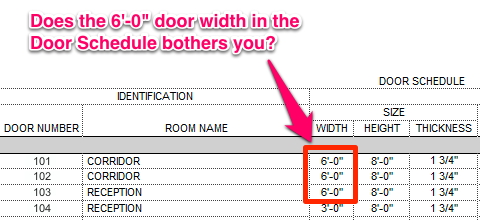
In AutoCAD, we usually put 3′-0″(PR) in the the door width field to indicate a pair of door in the Door Schedule. But in Revit, door width for a pair of door reads as 6′-0″ in the Door Schedule. I wish Revit has an option to set the width to read as either 6′-0″ or 3′-0″ (PR). It really bothers me for a while. The door is actually (2) 3′-0″ door, but the door schedule makes it look like the door is (1) 6′-0″ wide door. I understand we can always refer back to the door elevation for reference, but making it clear in the door schedule will make our life easier when reviewing shop drawings during CA.
Instead of complaining what Revit can’t do, why don’t we look for a work around solution? I believe conveying the information clearly in the construction documents is the key. My solution? I add a new column next to the door size called Single / Pair. This column indicates whether the door is a single or double door. I will go one step further to make this an automatic populated field to avoid human error.
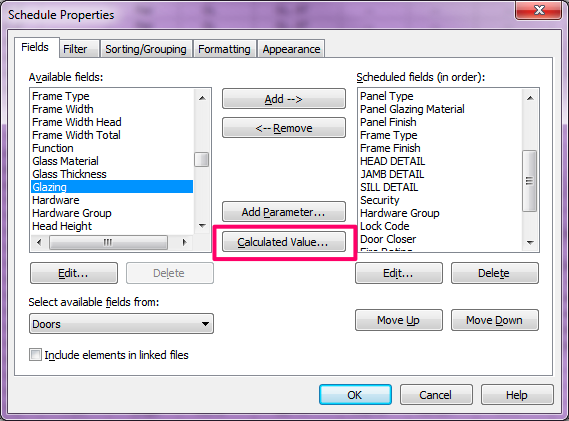
To get started, open up the Door Schedule. Click on the Field button in Properties.

Once the Schedule Properties menu opens, click the Calculated Value button. I am going to input a formula to make it automatically show the door as either Single or Pair in the Door Schedule.
In the Calculated Value window, input the field as shown in the image below.
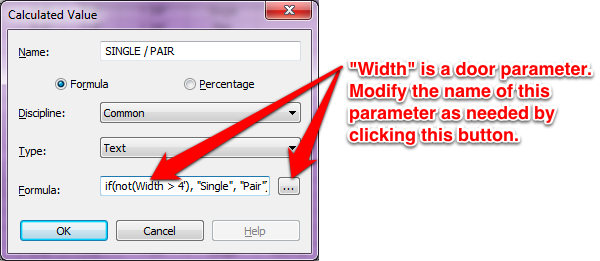
In the Name field, call it the name you want it to show in the Door Schedule column title. In the Formula field, type in
![]()
What this formula mean is: if the door width is not greater than 4′-0″, input “Single”; otherwise, input “Pair”. The word “width” you see in the formula is actually the name of the door width parameter. If you name the door width parameter something different, change that word in the formula accordingly by clicking on the […] box to select the correct parameter. You can also change 4′ to a different number to fit your project need. I put in 4′ just because my project only have 3′-0″ and 6′-0″ doors.
Exit Schedule Properties and go back to our Door Schedule. You should see a new column added into your schedule. In my case here, it is called Singe / Pair. You can see that the fields are all automatically populated based on the door width. This make it very clear to see which door is single or double.

This is my response to the problem. If you have a better solution, please don’t hesitate to share it with us!
I can’t get this to work?
It keeps telling me “Single” is not a valid schedule field?
Any help appreciated.
Thanks,
Keith
Sounds like you are trying to manually input the value “Single” into the door schedule and got this error message. Once you follow the steps to input the formula and created this new column in the door schedule, the value should be automatically fill out for you. You should not be entering the value by yourself. Let me know which step went wrong, I am happy to help you.
Hi Veng,
No, I was doing it correctly.
Just re-entered the formula and it worked OK this time?
The formula on this page is missing a bracket which I corrected last night.
The only thing I changed tonight was I retyped the quotation marks and removed spaces.
All OK now.
Thanks,
Keith
PS: I’m new to Revit, just bought the LT subscription version.
Is there a way to have the door schedule only have interior doors?
My schedule is showing Glazed external sliders as a”pair” ?
It’s Ok I’ve figured the schedule out.
Just added the “Type Comments” field to schedule, and updated door families with descriptions.
🙂
Keith
Good catch Keith! I just corrected the formula. Thanks for pointing it out.
I’m getting that 4′ is not a valid field. Help Please. Thanks
The formula is correct. I noticed that Revit is not reading ‘ and ” symbol properly if you copy and paste the formula from the website directly into Revit. Try input the formula manually into Revit and it should resolve the problem.
Great article, exactly what I wanted to find.
Also visit myy blog; seo Hemel Hempstead – Linwood,
This formula would show Double for Overhead Doors. Personally I have found making a Shared Parameter and manually writing in Single or Pair in the Family works just fine.
Clint, I like your comment. This is the beauty of the comment section – hearing thoughts and ideas from different people. In Revit, there are many ways to achieve the same result. I have to say the method in this blog post is more geared for project that don’t have special door such as overhead door, using the formula will automate the result, which results in time saving. For long term solution, I agree with your method to create a shared parameter and enter Single or Pair manually, this is the ideal way of doing it. However, that will require the person to go to each door family to add this shared parameter. For quick solution, I will do it as a project parameter, in which you can also enter Single or Pair manually, if you are on a deadline, this method will save you time without the need to edit each door family, and it also works with overhead door in the schedule.
Its not working for me. I entered the formula as follows.
if(not(Width > 4′), “Single”, “Pair”)
The new field shows up but I cannot toggle from single to double to change the width. Am I misunderstanding the functionality of this field. Any help would be appreciated.
D, you need to change the door width in the schedule to affect the result of this new “Single/Pair” field. What this formula does is to read the door width parameter and automatically determine whether this door is a single or pair door. This field cannot be changed manually, the content is generated automatically.
Yeah, I figured. It’s been since there was a post on this forum.1-2) Here’s the error mseasge: Unhandled exception has occurred in a component in your application. If you click Continue, the application will ignore this error and attempt to continue. Object has not been initialized yet I’ve done a bit more playing around and found that this error only happens when I close the family that I initially had open when I launched the add-on. So if I leave that open and then open the others and apply their param’s before I close the initial one, it’ll work fine.3) Might be worth keeping the parameter information in the program somehow and then just loading when there is a change. As opposed to loading every time it opens. I’m not a much of a programmer, so I don’t know how easily this would be implemented.4) It is a very odd thing. I’ll click the add-on and wait for it to load. Then I minimize Revit and it’s sitting there open. Once I click on the program window then it will show up in the taskbar. I’ve even set my nVidia desktop manager to send the window to my other screen and to bring it to front, but it is still appearing behind other windows. I agree on sending it to front by default, but I’m clueless as to why it would open this way.If you need any more system info, let me know I’d be glad to help.Thanks!Casey