Revit tried to make creating a door schedule a breeze. No more making your own schedule, just add all the door parameters you need to show in the door schedule and it will automatically populate most of the information for you. Sweet! But wait until you start editing some of the field in the door schedule, you realized they are not editable! Bummer! So what is the problem? Why can we edit the field for some doors but some not?
We need to understand a few basics:
- Door parameters – Parameters defines the properties of the door. Common parameters in a door family are door height, width, thickness, swing degree, frame materials, etc. These parameters are information that can appear in the door schedule.
- Door Family – Families are components used to build a Revit model. You are likely going to have many different families in a single model. Common door families used are single door, double door, door with side lite, glass doors, etc.
- Each door family may not necessary carry the same list of door parameters. For example, some door families might have a parameter called “Fire Rating” defined, but some door families do not. For this reason, when you include the door parameter “Fire Rating” into your door schedule, doors that have this parameter will find the field editable, but doors that doesn’t have this parameter will find the field un-editable. Simple concept! To make all the fields become editable, we need to add the “missing parameter” to other door families.
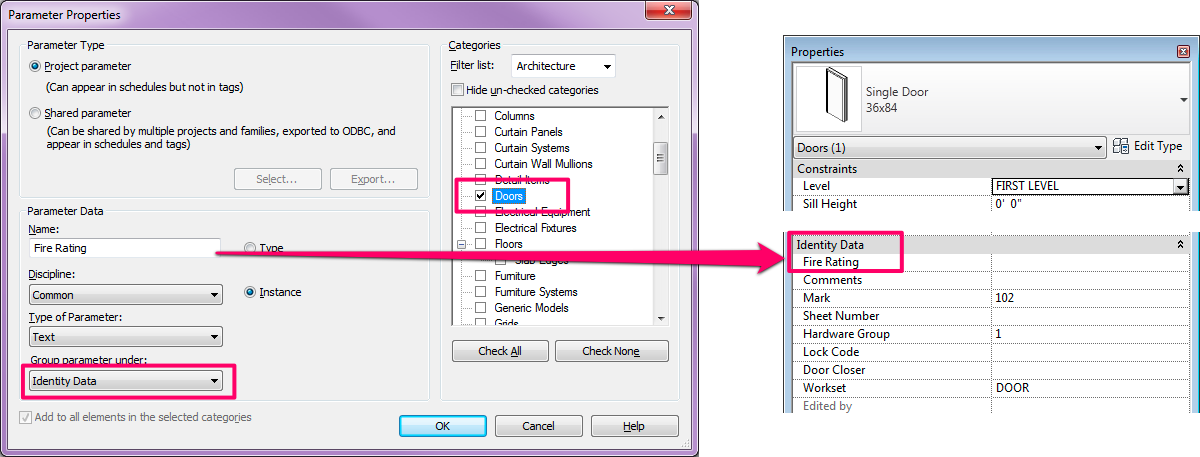
Adding “Missing” Parameter to Door Family
There are two approaches, but first we need to make the “missing parameter” a “shared parameter”.
- Proper method – Load the shared parameter into each door families. Yes, very time consuming, but this is the proper way. The advantage is when you reuse the door family in another project, you do not have to do this all over again with this method.
- Quick fix method – If you are on a deadline and need a quick fix. Load the shared parameter into the Project Parameters in the project model. Make sure you assign this parameter to the Door Category. This is the quickest way to get the job done. This parameter now becomes available to all the doors in the model.
Adding “New” Parameter to Door Family
What if you need to add a brand new parameter into the door schedule that does not exist in any of the door?
- Proper method – Create this new shared parameter and “share” it with all the door families. Basically, you will need to open up every door families in your project and load the parameter in.
- Quick fix method – You have two options: 1. Create this new parameter directly as a Project Parameters in the project model. 2. Create the parameter as a Shared Parameter first, and then load it into the project. For either option, make sure you assign this parameter to the Door Category.
Whether you are adding a missing parameter or a brand new parameter, the solution is pretty much the same. The only difference is in the quick approach solution.
- If the parameter already exist in some of the door family, we need to turn that parameter into a shared parameter before we can add it into Project Parameter.
- If the parameter is brand new, you have the option to create and add the parameter directly in Project Parameter or create a Shared parameter and then load it into the project. But remember, adding door parameter directly to Project Parameter is a “cheating” method to get the job done when you are in a time crunch, it is not a good practice. It is always preferable to create it a Shared Parameter and load it into the project. If there is already a Shared Parameter file created in your office, it is highly possible you will find the parameter you need from there.
Why Shared Parameter? Even if you create another parameter that is identical to the parameter in another family, Revit doesn’t recognize it as the same parameter. Every time a new parameter is created, Revit assigned an unique ID to the parameter. To make Revit recognize it as the same parameter, you need to “share” the parameter with other families. That way, Revit knows all your door families are carrying the same parameter.
I am having trouble getting my door schedule to populate. Information such as material, finish, type and glazing is not populating while width, height, thickness is. Is there any way to get this information to populate in the door schedule? It would save me a lot of time since we have over 100 doors in our schedule.
Any help is greatly appreciated.
Thanks,
Luca
Luca,
You can choose to enter the information by selecting each door or you can go directly to the door schedule to enter the data. The door width, height and thickness are all populated because you need to define them when you first insert the door in the schedule, however, the rest of the parameters can be defined after the door is in place. That is the reason why you see the rest of the parameter “blank” in the door schedule. Also, check whether the parameter is by Type or by Instance. If the parameter is by Type, you will see the data you enter appeared at other door with the same type in the schedule. If the parameter is by Instance, you will need to enter the data for each door.
For example, you have door type “3’x7′ Wood Door”, you have set the “Material” parameter as “Type”, so any door in the project that use the”3’x7′ Wood Door” door type will have the same material show up in the Door Schedule, which means you only have to update the Material for one door and the rest using the same door type will be updated automatically. For the same door type , you have another parameter called “Fire Rating”, depending on where the doors are located, the fire rating of the doors varies in the project, therefore, this parameter is set as an “Instance” parameter. The fire rating information will need to be entered one by one in the door schedule.