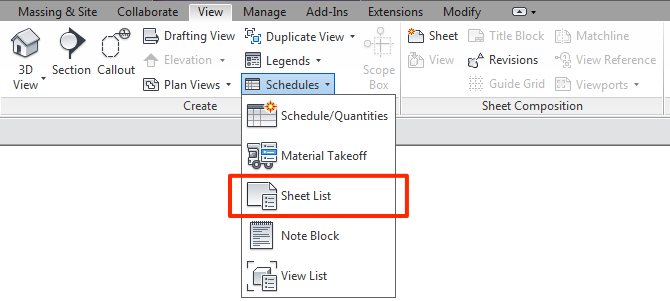
It is time to create the Drawing Index for the Cover Sheet! Now, where to start? Revit has a tool to create Sheet List, it is under the View tab > Schedules (under Create panel) > Sheet List

The list will include all the sheets you have created for your project, Easy! But what about your consultants drawings? How to include your consultants drawings (such as Civil, MEPs drawings) into the sheet list? There are several ways you can do to achieve this.
- Method 1: Create a Dummy Sheet
Create blank sheets for all the consultant drawings, this will get your job done but very time consuming. All sheets created will display in the Project Browser and you have full control on how you want to sort them.
- Method 2: Add Placeholder Sheets
With this method, you are only adding the Sheet Number, Sheet Name into the Sheet List without creating an actual “Sheet” in the Project Browser.
Open up the Sheet List Schedule you created earlier, under the Modify Sheet List tab > New (under Rows panel). This will create a placeholder sheet to the Sheet List.
You can also control the display of Placeholder sheets in the Sheet List by clicking the Show, Hide and Isolate button.
Show – Display all the sheets in the list
Hide – Hide the placeholder sheets
Isolate – Display only the placeholder sheets

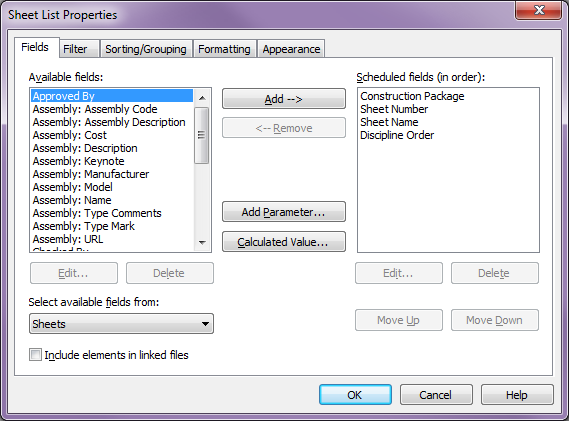
To arrange the placeholder sheets to the correct discipline, go to the Sheet List Properties > Field > Add “Discipline Order” parameter from the “Available Fields” (left) to the “Scheduled Fields” (Right). Now, you can assign your placeholder sheets to the appropriate discipline.
** (Update) Please check my other post Using Parameter to Control Sheet List Order to learn more about how to Setup the Discipline Order parameter.

Please note that the placeholder sheet WILL NOT appear in the Project Browser, it will only be displayed in the Sheet List.
- Method 3: Bring in the sheet list from the linked Revit Model
Since you already have the consultants model linked into your model, we can as well bring in the Sheet List from the consultants model.

By default, the sheet list from the linked file will not show up unless you click the “Include elements in linked files” check box. This sounds like the most ideal way of creating the Sheet List. However, since the list is coming from a linked model, if the order, sheet name, sheet number, etc. is wrong, it needs to be corrected in the linked model. You will also need to create a “Sheet Order” shared parameter to control the order. Your consultants need to have the SAME shared parameter as you do, all you have to do is export the “Sheet Order” parameter you created and send it to them. This method adds another level of coordination between consultants, but will definitely save you lots of work in the long run.
in Adding Other Disciplines to Sheet List you say; To arrange the placeholder sheets to the correct discipline, go to the Sheet List Properties > Field > Add “Discipline Order” parameter from the “Available Fields” (left) to the “Scheduled Fields” (Right). Now, you can assign your placeholder sheets to the appropriate discipline.
where do I get the “Discipline Order” parameter?
This is a custom parameter created for sorting the drawings. I will take your question as the next topic in my blog post. So stay tune.
Awesome! This post along with the browser organization and the parameter to sort the sheet list posts are just outstanding. The step by step with the screen shots and highlighted info make it so much easier to follow than a lot of other posts I have seen.
Whar is keynot
Anil, I don’t quite understand your question. I am happy to help if you can further explain your question.
Hi,
Great article, ive been using revit for 5+ years but still learning! any tips on how to schedule consultants revisions other than creating blank sheets? thanks!